What's in this Blog?
we've already learned how to install and set up different packages and libraries in ROS2-Humble in our previous blog, but this time we're going to move further into understanding ROS2 and its use-cases, one of which is using URDF (Unified Robot Description Format) - every robot you see in RViz or Gazebo starts with one thing: a URDF - without it, ROS2 has no idea what your robot looks like or how its joints are connected.
URDF is an XML-based specification used in ROS2 to describe the physical and kinematic properties of a robot, and a URDF file is primarily built using 2 elements - links & joints.
the main objective of this blog is to help you understand how to work with URDF and also integrate RViz (ROS Visualization in 3D) & Gazebo (Performing Simulation) along with it - and finally build an actual beginner-friendly project.
Getting Started - Installation & Setup
without wasting much of our time, let's get started with all this - we will first refresh our system's local database of available packages.
sudo apt update
now, we install all the necessary packages using the below command.
sudo apt install -y \
ros-humble-joint-state-publisher \
ros-humble-joint-state-publisher-gui \
ros-humble-robot-state-publisher \
ros-humble-xacro \
ros-humble-rviz2 \
ros-humble-tf2-tools \
ros-humble-gazebo-ros-pkgs \
ros-humble-teleop-twist-keyboard
Optional: if you want to go one step further and prepare for mobile robot control and future hardware integration, install these as well:
sudo apt install -y \
ros-humble-ros2-control \
ros-humble-ros2-controllers \
ros-humble-controller-manager \
ros-humble-diff-drive-controller \
ros-humble-joint-trajectory-controller
Verify your Installation
to check if all the packages have been installed correctly, run the below commands one-by-one.
ros2 pkg list | grep robot_state_publisher
ros2 pkg list | grep joint_state_publisher
ros2 pkg list | grep xacro
ros2 pkg list | grep gazebo_ros
you should see the below outputs for each of the above commands that you run:
aayush@AnilMishra:~$ ros2 pkg list | grep robot_state_publisher
robot_state_publisher
aayush@AnilMishra:~$ ros2 pkg list | grep joint_state_publisher
joint_state_publisher
joint_state_publisher_gui
aayush@AnilMishra:~$ ros2 pkg list | grep xacro
xacro
aayush@AnilMishra:~$ ros2 pkg list | grep gazebo_ros
gazebo_ros
gazebo_ros_pkgs
Installation is Completed
Common Mistake: if any of the above commands return no output, the package wasn't installed correctly, re-run the
sudo apt installcommand and check your terminal for any errors before moving on.
Building a 3 Wheeled-Robot
before we build this project, we need to understand the structure first - what all necessary files and packages are being used or run here. below is an example of how our project's structure should/will look like:
directory structure:
└── aayushmishramechatronics-ros2-threewheel-robot/
    └── src/
        └── robot_wheel/
            ├── package.xml
            ├── setup.cfg
            ├── setup.py
            ├── launch/
            │   ├── display.launch.py
            │   └── gazebo.launch.py
            ├── resource/
            │   └── robot_wheel
            ├── robot_wheel/
            │   └── __init__.py
            ├── test/
            │   ├── test_copyright.py
            │   ├── test_flake8.py
            │   └── test_pep257.py
            └── urdf/
                └── three_wheeled_robot.urdf
Step-1. Creating Workspace
starting with the very basics, we'll create a workspace - followed by a package inside which we'll have all our required launch files and nodes.
mkdir -p ~/threewheel_robot/src #creates a workspace
cd ~/threewheel_robot #change directory to `threewheel_robot`
colcon build
source install/setup.bash

cd ~/threewheel_robot/src
ros2 pkg create robot_wheel --build-type ament_python
Note:
colcon buildcompiles your workspace, andsource install/setup.bashmakes ROS2 aware of your newly built packages, so you need to run the source command every time you open a new terminal.
Step-2. Creating Required Folders
before we start writing our code, we need to create some required folders for loading the .urdf file in sync with launch files, all in a structured manner without breaking anything in the workspace.
cd ~/threewheel_robot/src/robot_wheel

mkdir urdf
mkdir launch
mkdir rviz
mkdir worlds
Note: the
rvizandworldsfolders aren't needed immediately, but it's good practice to create them early, you'll use them in the upcoming blogs in this series.
Step-3. URDF
now, move into the urdf folder using the below commands and create a file with a .urdf extension in it.
cd urdf
touch three_wheeled_robot.urdf
Follow this Link to get the complete code for the three_wheeled_robot.urdf file. To understand in brief what is happening in the URDF file, we have the following important points:
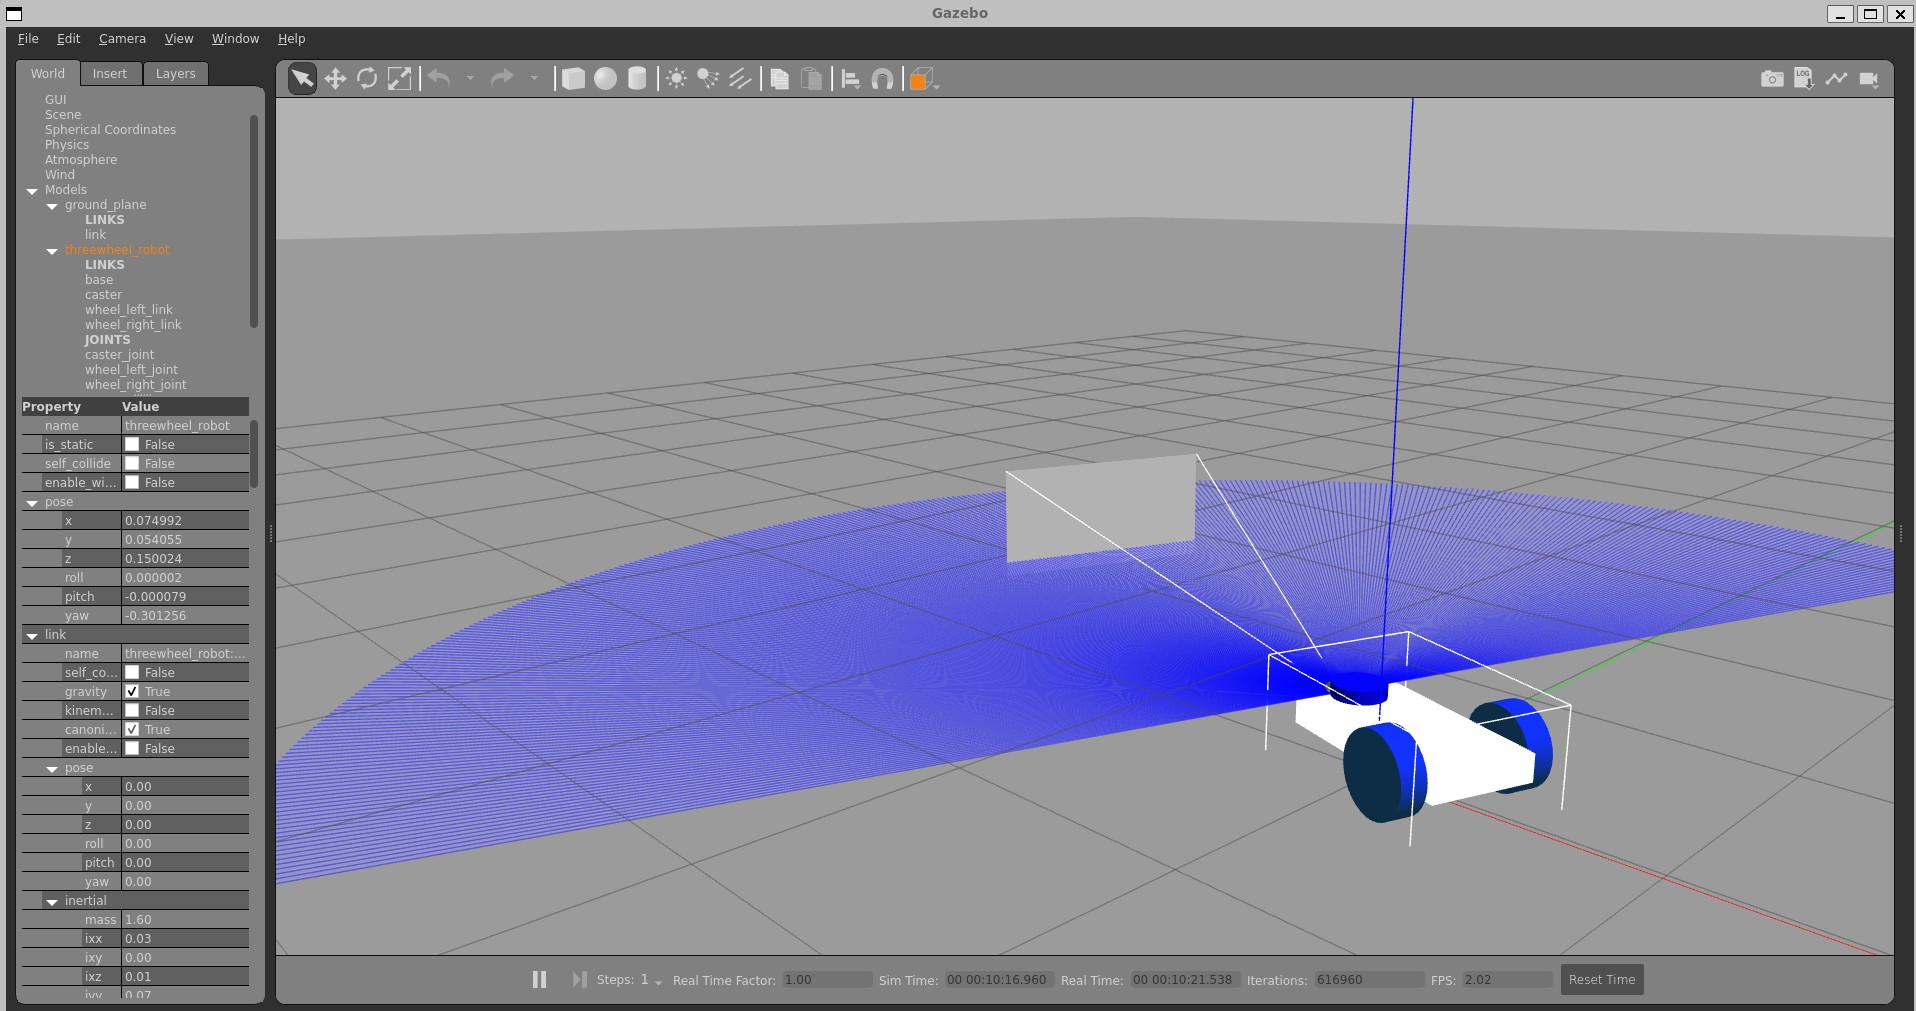
- 5 Links, 5 Joints - the robot is built from 5 physical links: a rectangular
base, two driven wheels (wheel_right_linkandwheel_left_link), a passivecastersphere at the rear, acamerabox, and alidarcylinder. Each link is connected to the base via its own joint. - Three-part Link Definition - Every link defines three things:
<visual>(how it looks),<collision>(its physical boundary for the physics engine), and<inertial>(mass and moment of inertia). All three are required for Gazebo to simulate the robot correctly. - Joint Types Matter - The two drive wheels and the caster use
continuousjoints, meaning they can rotate freely. The camera and LiDAR usefixedjoints since they don't move relative to the base. - Gazebo Material Overrides - Standard URDF colors don't carry over into Gazebo automatically. We define
<gazebo reference>blocks for each link to apply Gazebo-specific materials (e.g.,Gazebo/SkyBluefor wheels,Gazebo/WhiteGlowfor the base). - Three Gazebo Plugins - The URDF includes
libgazebo_ros_diff_drive.so(controls wheel speed via thecmd_veltopic),libgazebo_ros_camera.so(streams camera images at 30fps), andlibgazebo_ros_ray_sensor.so(publishes LiDAR scan data assensor_msgs/LaserScan).
at this stage you should have:
urdf/folder created inside your packagethree_wheeled_robot.urdffile ready with the complete URDF code
Step-4. Creating Launch Files
following is the structure of our launch folder and the required files in it:
 ── aayushmishramechatronics-ros2-threewheel-robot/
    └── src/
        └── robot_wheel/
            ├── launch/
            │   ├── display.launch.py
            │   └── gazebo.launch.py
now, we create our .launch.py files and understand what each one does.
a launch file in ROS2 is basically a python script that starts multiple nodes at once. Instead of running each node manually in separate terminals, a single
ros2 launchcommand handles everything for you.
display.launch.py
cd ../launch
touch display.launch.py
Follow this Link to get the complete code for the display.launch.py file. Here's what this launch file does:
- Loads the URDF - reads
three_wheeled_robot.urdffrom the package'surdf/folder usingget_package_share_directory()and passes it torobot_state_publisheras therobot_descriptionparameter, this is what makes ROS2 aware of your robot's structure. joint_state_publisher_gui- launches a small GUI with sliders for each joint, letting you manually move the wheels and verify that the URDF is correctly assembled - without needing Gazebo at all.- RViz2 - opens the 3D visualization tool so you can inspect the robot model, see all the links and coordinate frames (TF), and confirm that everything is connected correctly.
gazebo.launch.py
touch gazebo.launch.py
Follow this Link to get the complete code for the gazebo.launch.py file, and if you want to understand what is happening in this launch file then here's what this launch file does:
robot_state_publisher- same as indisplay.launch.py, it reads the URDF and continuously broadcasts the TF tree for all robot links so ROS2 always knows where each link is relative to the others.joint_state_publisher- publishes neutral (zero) joint states when the robot first spawns - without this, Gazebo may report TF errors at startup.Gazebo startup- starts Gazebo in--verbosemode and loads two essential plugins:libgazebo_ros_init.so(connects ROS2 to Gazebo) andlibgazebo_ros_factory.so(allows spawning robot models from ROS2 into the simulation).TimerAction (8-second delay)- waits 8 seconds before attempting to spawn the robot, this is intentional as Gazebo needs time to fully start up before a model can be inserted, reducing this delay often causes the spawn to fail silently.spawn_entity.py— After the delay, reads the robot model from the/robot_descriptiontopic and spawns it into the running Gazebo world asthreewheel_robot.
at this stage you should have:
display.launch.pyready with the complete codegazebo.launch.pyready with the complete code
Step-5. Modifying the Setup File
as we have seen in the previous blogs of our ROS2-Series, every package has a setup.py file that involves the console_scripts to be configured/modified so that the workspace stays in sync with the files and folders we've made inside the package.
here, we have the similar task of modifying the setup file. Follow this Link to get the complete code for the setup.py file, here's what the modifications accomplish:
data_files block— This is the key addition to the defaultsetup.py. It tellscolcon buildwhich non-Python assets to install alongside the package so they're accessible at runtime.- launch files —
glob('launch/*.py')installs all.launch.pyfiles to the package's shared directory, making them available viaros2 launch robot_wheel <file>.launch.py. - URDF —
glob('urdf/*')installs the URDF file soget_package_share_directory()can locate it at runtime. Without this line, your launch files will fail to find the robot model. - other asset folders —
rviz/,worlds/, andmeshes/are registered even if currently empty, so adding files to them later won't require further changes tosetup.py. console_scripts— Left empty intentionally. This package uses launch files to start nodes rather than standalone Python executables, so no entry points are needed here.
Common Mistake: forgetting to rebuild after editing
setup.py- always runcolcon build --symlink-installfollowed bysource install/setup.bashafter any changes to this file, otherwise your edits won't take effect.
at this stage you should have:
- workspace created and built
- package
robot_wheelgeneratedlaunch/folder with both launch files readyurdf/folder with the URDF file readysetup.pymodified to include all asset folders
Run the Project
our 2 out of the required 3 objectives have been met in this blog, as we have modelled our robot using URDF and integrated it with launch files for simulating it in Gazebo and displaying it.
in the next blog, we'll work our way around visualizing the TF tree and other parameters of our robot using the rviz2 command (do check that blog out too) - for now, let's run the project with the final commands below and make sure that everything is in sync so that our workspace doesn't break.
Terminal 1
cd ~/threewheel_robot
colcon build --symlink-install
source install/setup.bash
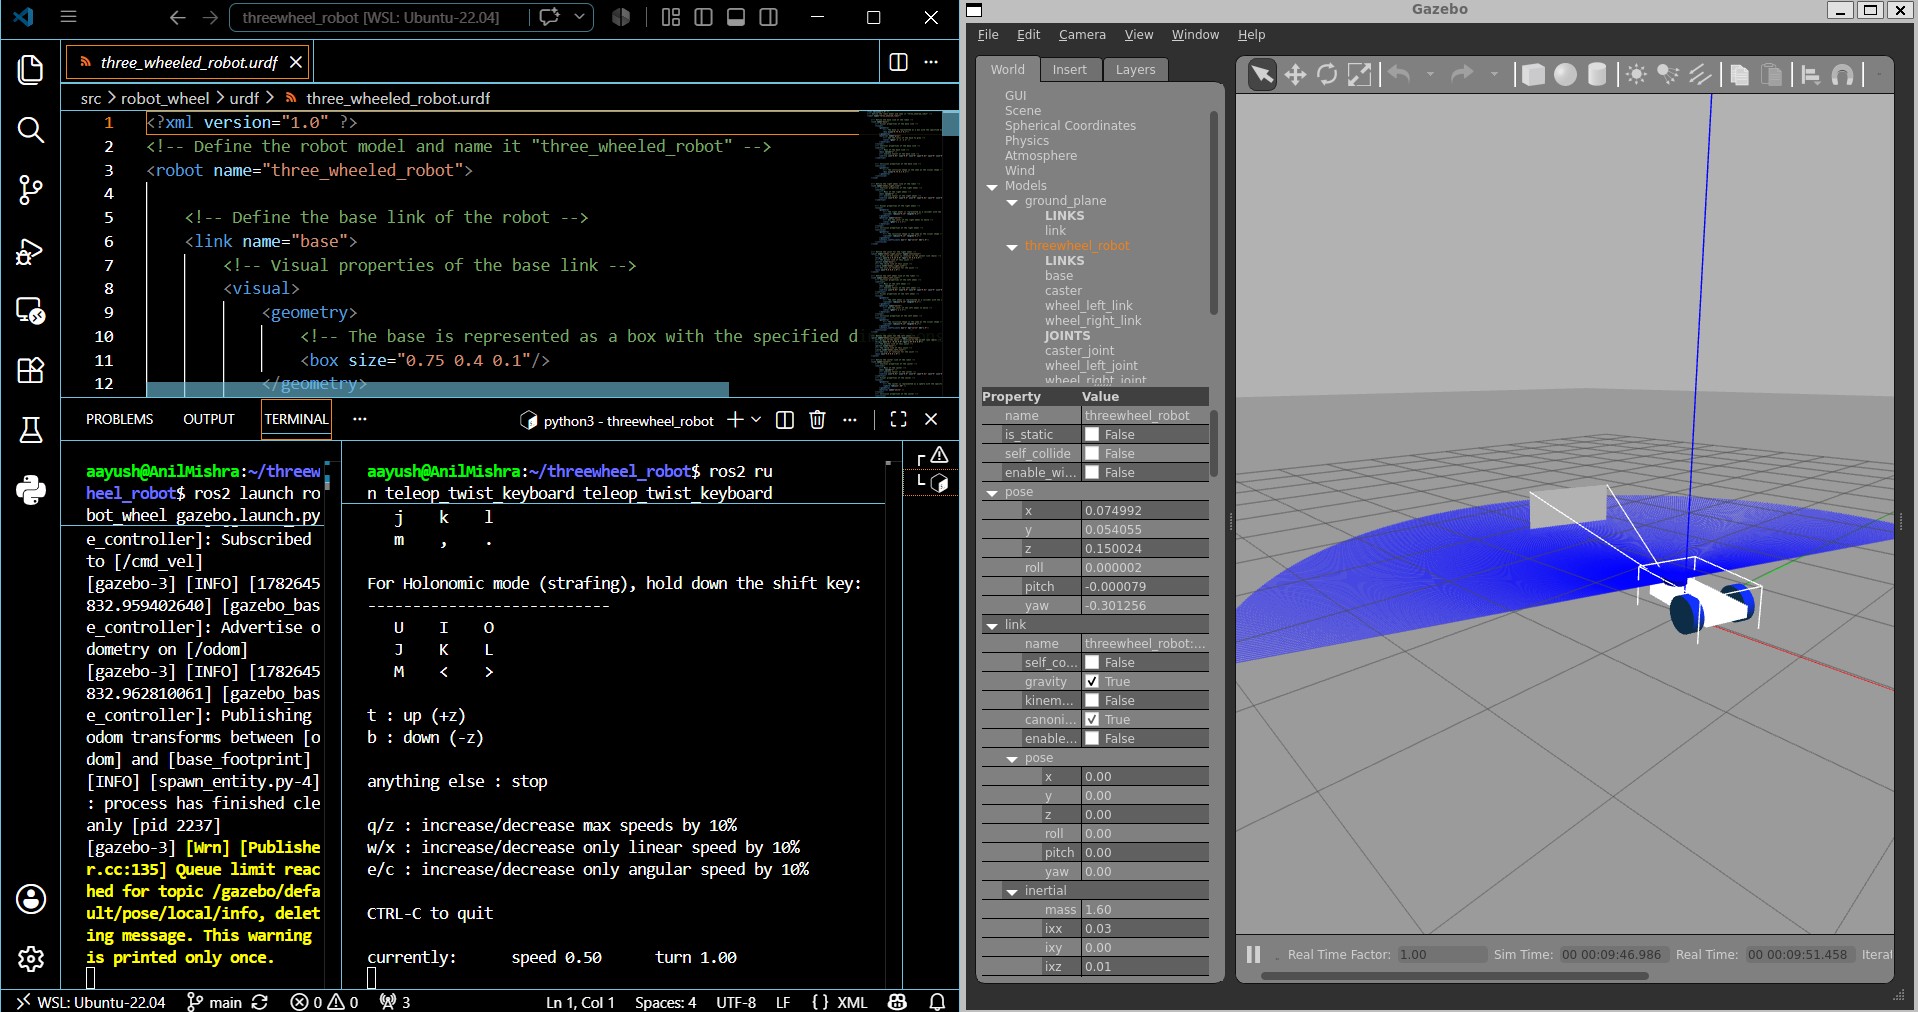
ros2 launch robot_wheel gazebo.launch.py
the output for the above command will somewhat look like the one mentioned below - wait for Gazebo to fully open before moving on to Terminal 2.
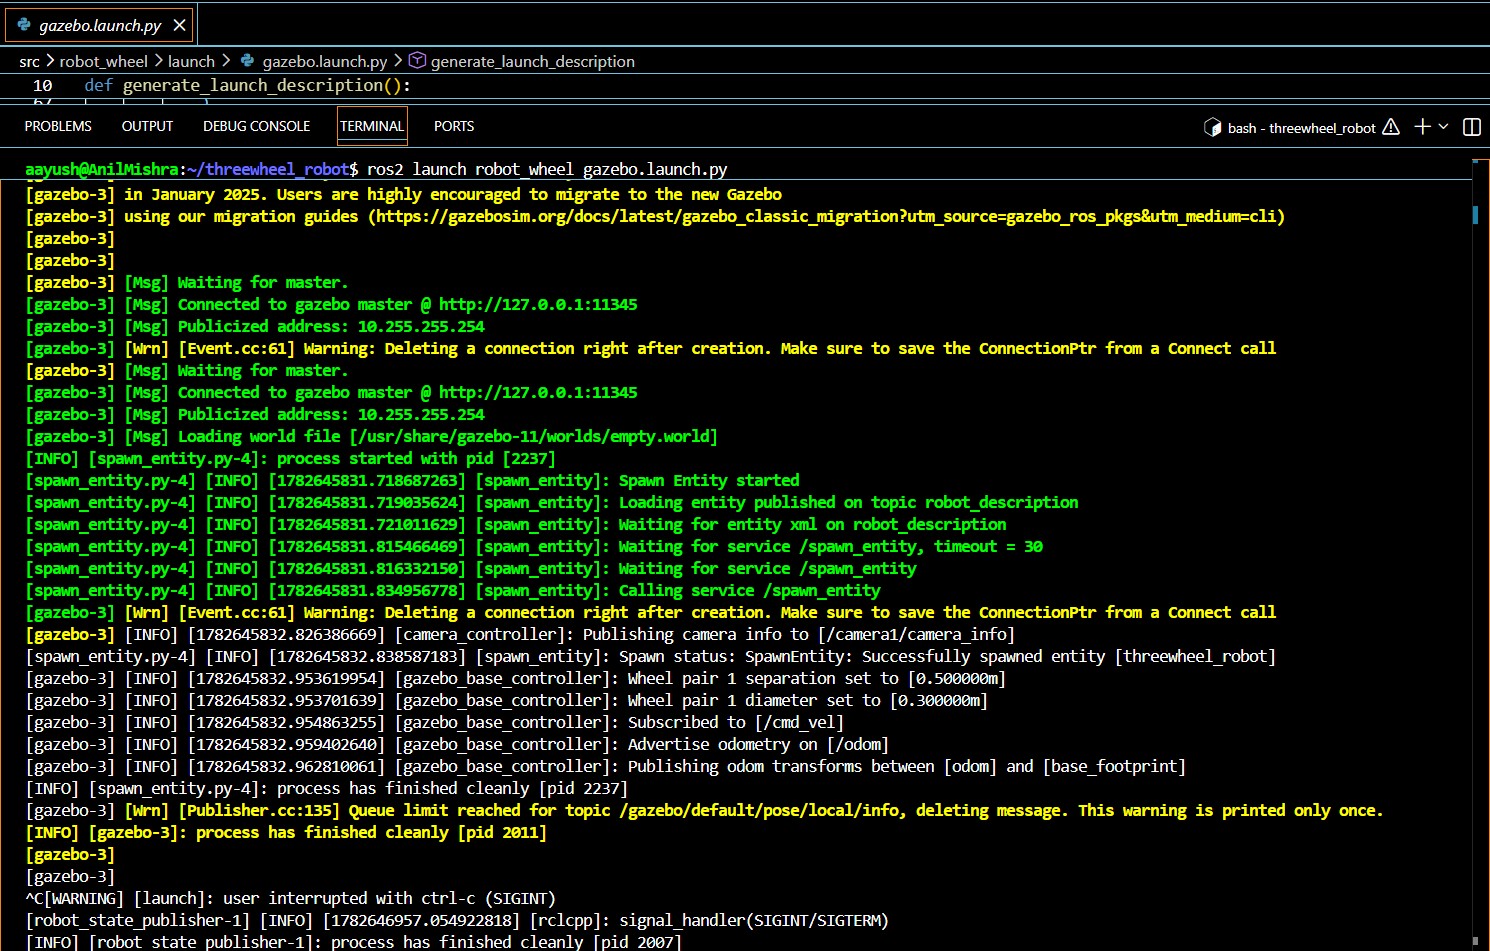
run the above command in Terminal 1 and split it, as we need Terminal 2 for running some other commands which are mentioned below:
Terminal 2
ros2 run teleop_twist_keyboard teleop_twist_keyboard
the output for the above command will somewhat look like the one below - use the keyboard controls shown in the output to drive the robot around in Gazebo.
This node takes keypresses from the keyboard and publishes them
as Twist/TwistStamped messages. It works best with a US keyboard layout.
---------------------------
Moving around:
   u    i    o
   j    k    l
   m    ,    .

For Holonomic mode (strafing), hold down the shift key:
---------------------------
   U    I    O
   J    K    L
   M    <    >

t : up (+z)
b : down (-z)

anything else : stop
q/z : increase/decrease max speeds by 10%
w/x : increase/decrease only linear speed by 10%
e/c : increase/decrease only angular speed by 10%

CTRL-C to quit
currently:      speed 0.50      turn 1.00
Note: keep the Terminal 2 window in focus while pressing keys - the teleop node only reads keyboard input from the active terminal window.
Summary
in this blog, we built and simulated a three-wheeled differential drive robot entirely in ROS2.
What we Built:
- a complete URDF model with a base, two drive wheels, a passive caster, a camera, and a LiDAR sensor
- two launch files -
display.launch.pyfor quick visualization in RViz, andgazebo.launch.pyfor full physics simulation in Gazebo - a properly configured
setup.pythat makes all assets (launch files, URDF, RViz configs) available after a colcon build
What you Learned:
- how URDF links and joints define a robot's physical structure
- the difference between
continuousandfixedjoints - how Gazebo plugins connect your robot model to ROS2 topics like
cmd_velandsensor_msgs/LaserScan - how launch files coordinate multiple nodes in a single command
- how to drive a simulated robot using
teleop_twist_keyboard
What's Next? in the next blog, we'll go deeper into RViz - visualizing the TF tree, inspecting sensor data, and understanding how coordinate frames relate to each other in a real ROS2 robot project.
Blog Continued Ahead - Move to the New Blog! Written by Aayush A. Mishra - June, 2026